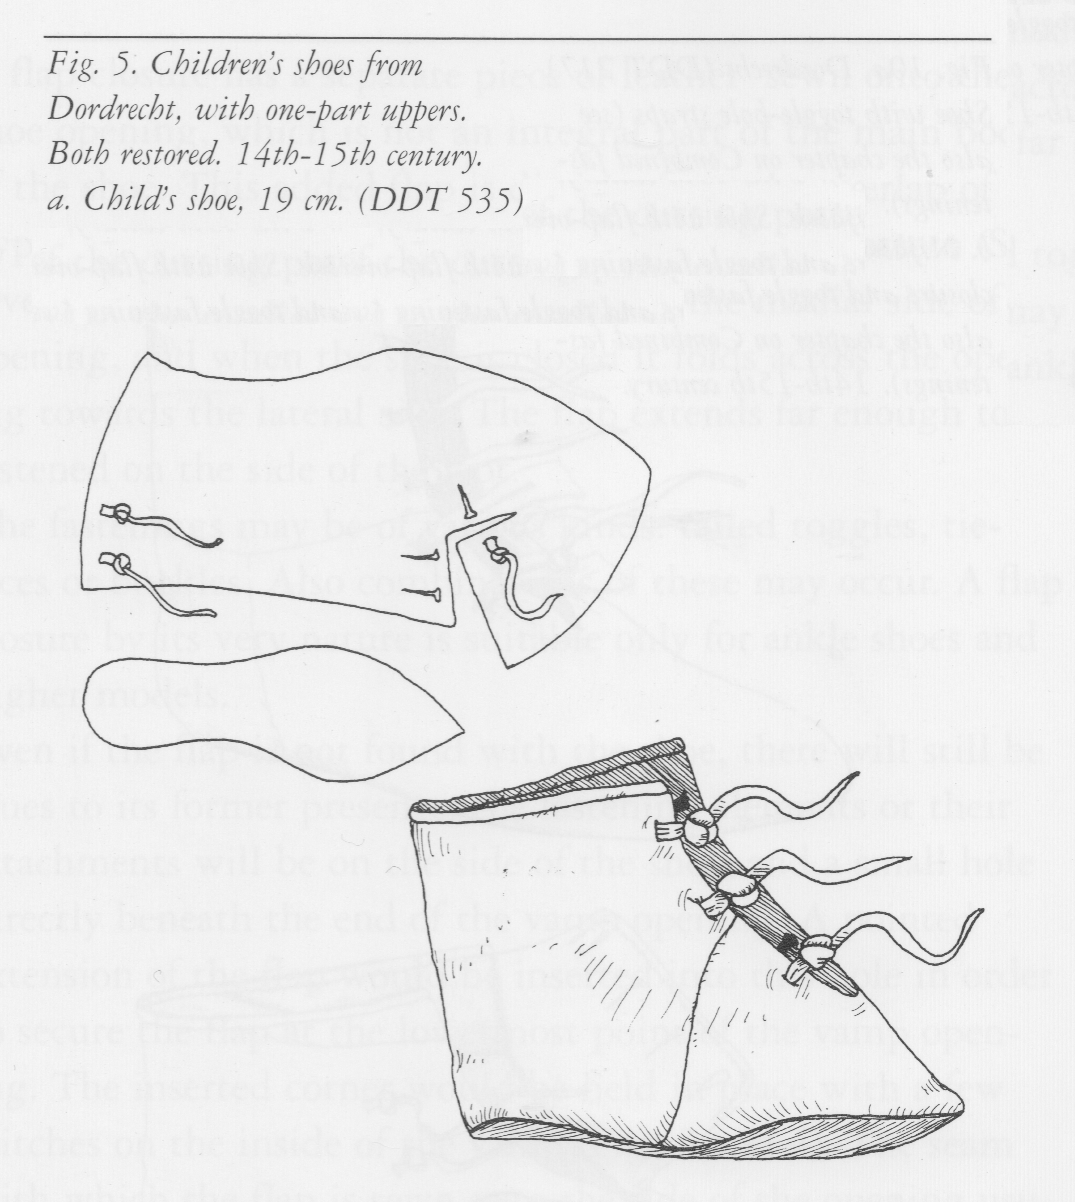
14th C. Child's Shoes
Steps
- Measure foot length.
- Scan pattern drawing and scale sole to measured size, print.
- Trace pattern onto leather for upper and sole, cut out both pieces.
- Stitch side seam using waxed-end boar's bristles with 2-ply linen cord through flesh/side holes made with curved awl. (The stiches are made on the flesh - inside - of the upper.)
- Stitch upper to sole using metal needles with waxed thread through side of sole leather punched into upper leather. (Stitching is done with the shoe inside out at this point.)
- Turn shoe right side in (dry turn, leather is soft and pliable enough to not need wetting).
- Stitch on heel stiffener using curved awl and curved metal needle.
- Freehand cut and knot tailed toggles.
- Cut slits for tailed toggles and stitch them into place using curved awl and curved metal needle.
- Stamp vamp once with moon-shaped leather punch.
- Punch holes along top of upper and whip-stitch with decorative embroidery thread.
Notes on the above process
- Measurements for two children were made and two patterns produced. The larger sole fit the smaller upper. This was discovered after stitching the upper. It is not clear why such a discrepency.
- Pattern is from Stepping Through Time, Goubitz, p. 203.
- Learning how to make waxed ends takes some time, but is likely rather more period than using metal needles, and is worth the time to learn. Bristles can be purchased on eBay by the gram, with 10g containing several hundred bristles.
- Coad, a mixture of resin / pitch / beeswax, is applied to the waxed end in order to attach the linen thread to the bristle. There are many, many recipes and opinions on how to make this substance. I used an eBay-purchased mixture of beeswax and resin marketed as bowstring wax.
- Using waxed thread prevents drawing out filaments that can be attached to a bristle. It's not a big deal to wax thread in the amount needed for a shoe. Eight different threads were purchased and tested for use in this project.
- Attaching the heel stiffener in 3D proved difficult. Attaching it flat was much easier, but despited best effort to align it properly, its position is about 50% off; it's not clear this is even needed.
- Archaeological finds often having holes along the top of the upper. These are assumed to be top bands. This shoe uses decorative embroidery instead.
- Many shoes have incised or open-work decoration. This moon stamp (purchased on eBay) was used in this case to mark the shoes for the person wearing them. She has a fondness for the shape.
- All stitching was done one hole at a time, by eye, with no measuring marks or devices.
- The toe did not turn totally, possibly because of a stitch in the very tip; it might be better to turn the shoe before closing the toe.
- Bristles work very well for delicate butt stitching, but not so much for upper/sole, stiffener/upper, or toggle/upper because of the angles needed to join the pieces; curved needles worked very well in those situations.
- Shoe #2 took four hours to complete, from tracing the pattern to completing the toggles.
Thoughts and observations for the next project
- Using an excavated piece of leather for a pattern may not be accurate because 1) its burial in the ground might have distorted it; 2) its use in life might have distored it (these are worn, discarded pieces of leather); 3) individuals' foot measurements can and do vary greatly. It is likely best to use a rough pattern with leather formed over a last for optimal results.
- No medieval curved awls have been found. A very sharp, thin, straight awl will likely be sufficient even with the side seam.
- The sole on this shoe is probably too thin for an adult shoe, and wet turning will be necessary in that case.
- The metal needles used to attach the upper to the sole were #10 harness needles; #4 will be used next time in order to achieve smaller holes.
Acknowledgements and resources
- Thanks to Rhiannon Bwa for leading shoe-making sessions and Elska Fjarfell for her sponsorship.
- Making waxed ends: http://shoemuseum.ch/shoemakers-waxed-end/, https://vimeo.com/10219171, https://vimeo.com/10218878 for videos.
- Books read, studied, and consulted: Stepping Through Time (Goubitz, 2001), Shoes and Pattens (Grew, et al., 2003), Archaeological Footwear (Volken, 2014), Archaeology of York (Mould et al., 2003).
- Other helpful and inspirational resources: http://www.personal.utulsa.edu/%7Emarc-carlson/shoe/SHOEHOME.HTM, http://www.personal.utulsa.edu/~marc-carlson/leather/plwt.html, http://wherearetheelves.net/ for general and specific information and opinions.