
Molding
Lend Me Your Foot
The person whose foot is being molded should be standing naturally at ease on a hard surface. They should be wearing an old sock that will be cut away during this process.
If their feet are significantly different in size or shape then this process should be repeated for each foot. If the feet are similar in shape and size, only one pattern is needed because it's simply flipped to make a shoe for the opposite foot.
It is best to make the molds late in the day, when the foot is likely to be a bit larger from being in use, as opposed to smaller directly out of bed.
- Place a sheet of light cardboard under a foot and trace the outside of the foot. Hold a pen or pencil vertically while tracing the toes, the outside of the foot, and the heel; angle it somewhat for the inside of the foot. Later you will even out the lines to form the exact sole shape you want, possibly adding more pointyness to the front. Tracing with a vertical pen usually means there's no need for additional seam allowance on the sole, but don't forget to add it when you venture away from the main part of sole, as when adding pointyness. Note on the cardboard what foot was traced.
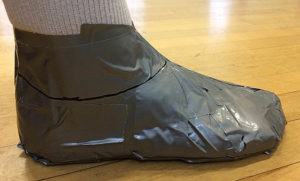
- Apply duct tape in pieces to cover the entire foot and higher up the ankle than you intend to make the opening for the shoe. Apply the tape without trying to stretch it, but don't leave it loose either. Apply the tape in various directions in various lengths and in multiple layers, three or four should suffice. You want to end up with a fairly stiff mold of the foot. Too little tape may mean the mold stretches later or distorts. Too much may make it harder to get off the foot. Probably three layers everywhere works best, but this isn't proved yet. Avoid wrinkles in the tape if possible. To get underneath the foot, have the person lift toe or heel, then slide the tape under face-up and wrap it over over the top.
- After applying the tape to the whole foot, trace the sole. I use a Sharpie marker held horizontal and slid along the ground: that's about the right thickness for the 9-10oz. sole leather I use. This takes a bit of patience, especially if the duct tape is wrinkled. It's also a bit complicated trying to figure out where to trace on the inside of the foot.
- Next, use the Sharpie to mark the ankle opening in the profile for the period of the shoe you will make. For example, some styles want a straight cut, but others want the ankle line to dip way down.
- I find it helpful to mark the molded foot's line between ankle and big toe along the instep; the ball of the foot; back of the heel, etc.... just general reference marks that may or may not be checked later, usually for decoration or aligning the uppers with the sole before stitching.
- Mark the side seam: this is where a one-piece-upper turnshoe will have its line of stitching. Almost always this is on the inside (lateral) side of the foot. Some Viking Age shoes have the seem on the outside, though, so mark accordingly.
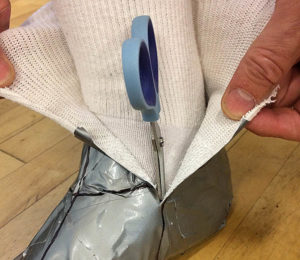
- Cut the taped sock off the foot. I do this by starting above the side seam and going straight down to the sole. I highly recommend bandage scissors like this $4-pair to remove the taped sock. Their small size, curved blades, and blunt ends allow for easy manipulation and prevent an unscheduled blood draw from the foot.
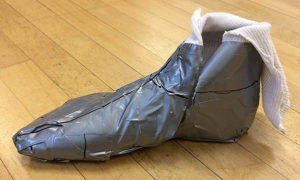
- At this point it should be easy to gently remove the molded sock from the foot without danger of distorting the shape. Keep the mold from excess heat and in a place where it can keep its shape. You don't want it to deform before you need to open it. You should tape the cut side seam back together to help keep the shape until you're ready to cut the leather.
- When ready to trace the pattern, cut away the sole along the line you traced. Also cut away the sock at the ankle opening. I find it useful to make a few snips of the mold at right angles to the line along the toes and ball of the foot in order to help the 3-D mold lay flat for tracing.
- Trace the flattened mold onto light cardboard, adding 1/4" seam allowance to the lines where the uppers will join the sole. This is the pattern for your uppers. Note on the cardboard what foot was molded and which side is face out. That is if, if you traced the right foot, note on the cardboard that it's the right foot's outside. This will help later when tracing onto the leather.
(It is not recommended that a person try to make their own mold or foot tracings because it's likely that the result will not be accurate. However, at some point I will try this on myself to find out for certain whether it can work.)
Last updated April 23, 2018.