
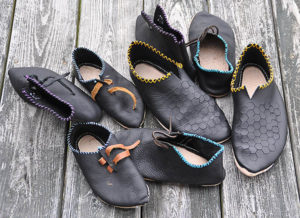
The Whole Family
In the SCA, we have chosen to portray personae from 14th-century England, so we need a style of shoes appropriate to that time and place. Given that these will be my first shoes likely to be worn, I chose a simple example for ease of execution.
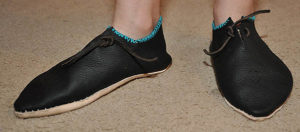
My second pair of turnshoes: for an 11-year-old girl
A pattern was scanned from Grew and de Neergaard, fig. 99, p. 65 and enlarged such that its sole dimensions matched Kelley's foot length, then enlarged further, ultimately to 525%. This pattern was then traced onto non-stretching canvas and draped onto her foot, and adjusted in a few places for best fit. That result was then traced to canvas for another fitting, which was significantly incorrect in at least three places. That method was then abandoned and her socked foot was wrapped in duct tape, marked for its sole and lateral seam, then cut off her foot. The resulting flattend ducktape-sock was traced to light carboard, which was then traced to leather and cut.
On this second project, for the side butt seam, a new curved awl was initially used with waxed end from left-over 2-ply waxed black linen thread. However, this awl did not produce good holes: it seems to be less sharp on the blade and/or gets too thick too fast. In any case, it was difficult to produce good holes, and the waxed ends had a deal of trouble getting through. One of the linen threads broke pulling through the second or third stitch. So that bit of work was undone.
New #4 harness needles were then used for the side seam, as well as a very sharp thin straight awl. This is a bit more awkward to use and requires more care to keep within the thickness of the leather when coming into it from the side. White 3-ply unwaxed linen thread was used for this seam. The metal needles worked well and did not leave me wanting the bristles, perhaps because the holes were straight rather than curved from the awl.
A much thicker sole leather was used for this pair of shoes, and it made attaching the sole much faster. The same white waxed thread was used. The #4 harness needles worked out very well, but still required continuous plier work because they are smaller and slippier and hard to hold and press through. One had its eye break about 3/4 of the way through the work. About 3/4 inch on each side of the toe point was left unstitched to facilitate turning.
After the sole was added, a slit was cut into the vamp - this will be needed to allow the foot into the shoe, and seemed likely necessary to make turning possible. The shoe was soaked in lukewarm water for 10 minutes and then turned without much trouble. Dried newspaper was put into to help keep the shoe's shape. The intended recipient tried the shoe barefoot: she reported it being a bit tight, but it is likely to stretch to fit her, at least barefoot (it may be too small for wearing with socks).
While still wet, the toe was turned and stitched with a single needle and thread, trying to tuck in the upper and go through the sole edge to interior. This was awkward and shows the thread rather more than desirable: it's not clear how to achieve a nice stitch here, where to knot the thread, and how to make this work out well.
A single heart-shaped punch stamp was applied to the vamp, and light blue embroidery thread was whip-stitched around the ankle opening for decoration.
These shoes turned out to be significantly too small, most likely for a lack of seam allowance. However, they do fit the younger child fairly well so all is not lost.
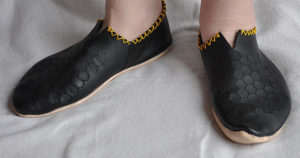
Pair #3, for an 8-year-old girl
As above, except that 1/2" inch" seam allowance was added to both the upper and the sole. Both side seams were completed with a single waxed end (one-shotted!) The upper turned to be too small for the sole, which was trimmed 1/4" all around. In this iteration, the toe was stitched and turned without trouble. The fit is a little large, which is acceptable in this case.
For fastenings, two small holes were punched on each side of the vamp slit, and a single thong passed through all four to serve as a tie on the inside of the foot. Blue embroidery thread was used to make a cross-over pattern around the opening. This doesn't look that well in the end: the holes should have been spaced more widely.
Shoes for Mommy
This pattern was also created via duct tape draping. This time, however, instead of draping the tape and flattening it as it met the ground, the tape was applied upside down to the bottom of the foot all around and the sole was kept totally separate. A small slit was made in the toe to facilitate the pattern flattening, and the extra resulting space incorporated into the cut upper. A hex-shaped stamp tool was used on the flat upper to create a honeycomb pattern.
A 1/4" seam allowance was sketched onto the upper and sole. This pair uses a new side of leather that proved more difficult to pierce for the upper seam. Both waxed ends failed and the new, sharper, curved awl did not do well. I used the straight awl and #4 harness needles for the upper seam; even then with pliers it was difficult to stitch. The leather was a bit rubbery but a very good seam was made despite this, or perhaps because of it.
The upper turned out to be too small for the sole, once again, so the sole was cut down by 1/4" all around. A further crescent ~1/4" was cut off the heal after it became clear that the upper was still a bit too small as it was being stitched on.
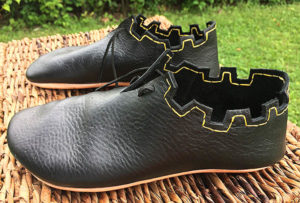
Shoes for Daddy
As the final pair of four, I decided to try something a bit different: add crenellations around the opening, rather than simply using a whip stitching of colored thread. After these turned out as well as hoped, I added a line of yellow thread to trace the pattern so that it would stand out better. (I chose the crenellation design because it's part of my device; it is documented to roughly the proper time period, although on boots rather than shoes.)
Last updated April 16, 2018.